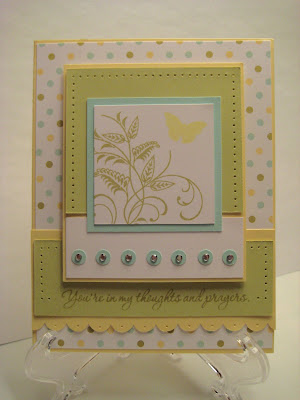
This card was for the Verve Mojo Monday sketch #75. I flipped the sketch vertically because I wanted it to fit the sentiment I chose, which is from Verve's Meditations stamp set. I made this for a co-worker whose brother unexpectedly passed away. Those who know me know how close I am with my brother, so to me that is one of the worst things I can imagine. There's not much I can do to comfort her, but hopefully this card brought a quick second of calm to her.
The main image panel features the butterfly and part of the large swirly vine from PTI's With Sympathy. I have to say, I'm loving this set! And not just for sympathy cards - I've made 3 or 4 cards with it just since it arrived last week, and this is the only one that's actually a sympathy card! The vine is stamped in Spring Moss and the butterfly is in Lemon Tart. I pulled my color scheme from the patterned paper, which is from PTI's Polka Dot Parade Collection. This card took me a while because it's more layers than I'm used to doing on layouts I design myself, but I liked stepping out of the box. Having so many components to a sketch forces me to use more of my supplies too! The 7 dots beneath the image are 1/4" circles punched out of Aqua Mist cardstock with a clear gemstone adhered to each of them. I pierced both pieces of Spring Moss cardstock to frame the image and the sentiment and stamped the scallops with my SU punch.
Thursday, February 26, 2009
Wednesday, February 25, 2009
February PTI Blog Hop
It's time for the Papertrey Ink Blog Hop! I'm so excited to be able to participate again after missing the last few months. This month's challenge was to create a spring-themed project using any images/colors/themes that say spring to us.
This card is very much not my usual style in terms of the color combination. It's not one I've ever used before and I tend not to combine multiple bright colors. Normally if I use a brighter color, it's tempered with something softer or a neutral, but I am actually loving how this turned out! I knew I wanted to use the grass/stems and flowers from With Sympathy, but that was all I had decided. I stamped the grass in New Leaf and then looked at the rest of my PTI ink colors and pulled out 3 (Berry Sorbet, Summer Sunrise, and Plum Pudding) that just seemed to speak to me as pretty and springy. I was a little skeptical about how they'd look together, but as I was stamping the flowers, I started really liking it!
I pulled out the matching papers from the new Bitty Dot Basics collection (LOVE that paper!!), along with some Berry Sorbet twill ribbon, my circle punches, clear gemstones, and the sentiment from Birthday Basics to complete the card. I used the Verve Mojo Monday Sketch#74 to put the layout together. All in all, I'm really happy with how this card turned out and hopefully I've learned to broaden my color combo horizons a little!
Thanks for looking!
Tuesday, February 24, 2009
Viva la Verve Challenge #4
This card is for the 4th and final Viva la Verve Challenge. The twist for this one was to use some acetate. I REALLY struggled with this card - it took me over two hours to come up with the design and put it all together, which is a really long time considering I had the layout already decided for me! I pretty much never use acetate on my cards, so I was really stumped as to what to do. I don't have any full sheets, so there wasn't enough to use as a card base. The only acetate I had were the pieces that my PTI stamps come on - I knew I was saving those for a reason!
I ended up stamping the verse, which is my absolute favorite verse in the whole Bible, on the acetate with Palette Noir ink. I then stamped the cross with Rose Red onto PTI white cardstock and attached the acetate to the cardstock with the black brads.
I had left the white panel on the right blank at first, but sort of thought it was a little too plain, so I decided to try the polka dots to give sort of a reverse of the ribbon. I don't know how I feel about the polka dots - is it too "busy"?
I did not plan on adding that sentiment on the right - to me, the Bible verse was the sentiment. But then I looked at the sketch again and realized that sentiment strip was a component of the sketch and I didn't want to be ineligible to win just because I left that off. So, I used markers to color just the first few words of one of my Verve Plain Jane verses and stamped it on the little strip. I think it fits well with the message of the card, but I'm not sure how it works with the look of the card and everything else I've got going on there.
So that's it for the Verve challenges! I really enjoyed doing these, even the ones that took me a very long time! It's fun to have a jumping off point for the creative process, and sketches are my favorite type of challenge. Now I just have to keep my fingers crossed that I somehow win the grand prize and all those fabulous new Verve stamps!
Monday, February 23, 2009
Viva La Verve Challenge #3
For the third Viva la Verve challenge, the twist was to make a monochromatic card using the sketch. Clearly, I went with pink! The image is from PTI's Butterfly Kisses. I traced the wings with a clear spica glitter pen and the body is covered in Cotton Candy Stickles. The flowers are from the Target $1 Spot, and the pink gemstone brad is from Making Memories. I painted the flower with opal Shimmerz and really love how it looks in person with that extra sparkle! The ink, pink cardstock, and patterned paper is from SU, the white cardstock is from PTI, and the sentiment is from PTI's Birthday Basics.
Pork Tenderloin with Cherry Relish and Brown Rice Pilaf
This meal was my next endeavor out of the Taste of Home Healthy Cooking magazine and was also a keeper! This photo doesn't look nearly as good as the one in the magazine, but at least it's not scary like my lasagna photo was! The relish is very unusual, not a combination I would ever have come up with on my own, but it was really delicious and packed with antioxidants from the dried cherries. Given my recent successes with this magazine, I think I'll try just one or two more recipes and if those are successes as well, I'll be subscribing for sure!
Pork Tenderloin with Cherry Relish
Pork Rub
1 tsp. garlic powder
1 tsp. each dried oregano, tarragon, and crushed dried rosemary (I did not have tarragon and don't particularly care for it, so I substituted dried thyme instead)
2 pork tenderloins (1 lb. each), trimmed
Relish
1 large red onion, sliced
2 Tbsp. olive oil
3 Tbsp. sugar
1/2 c. dried cherries
1/4 c. red wine vinegar
1/4 tsp. crushed dried rosemary
1. In a small bowl, combine garlic powder and herbs; rub over pork. Cover and refrigerate for 30 minutes.
2. For relish, in a large saucepan, saute onion in oil until tender. Add sugar; cook and stir over medium heat for 10 minutes or until onion is browned. Add the cherries, vinegar, and rosemary. Bring to a boil. Reduce heat; cover and simmer for 10 minutes. Cool to room temperature.
3. Place pork on a rack in a shallow roasting pan lined with foil. Bake at 425 degrees for 25 - 30* minutes or until a meat thermometer reads 160 degrees. Let stand for 10 minutes before slicing. Serve with relish.
Nutrition Facts: 3 oz. cooked pork with 2 Tbsp. relish equals 217 calories, 7 g fat, 63 mg cholesterol, 46 mg sodium, 14 g carbohydrates, 1 g fiber, 23 g protein.
*I first took the pork out after 25 minutes and my meat thermometer only read 120 degrees. So I put it back in for another 5 minutes, checked it and it was only 130 degrees. I put it in for another 8 minutes two more times and the thermometer never got above 140 degrees, but the meat was clearly done. So I don't know if my thermometer was broken or my tenderloins were thicker than usual or what, but if you make this, plan on possibly needing to cook it longer than 30 minutes.
Brown Rice Pilaf
1 medium onion, chopped
1 medium green pepper, chopped
1 Tbsp. olive oil
1 1/4 c. uncooked brown rice
2 garlic cloves, minced
1 1/2 c. water
1 c. reduced-sodium chicken broth
1/2 tsp. dried thyme
1/4 tsp. pepper
In a large saucepan, saute onion and green pepper in oil until tender. Add rice and garlic; cook and stir for 3 - 4 minutes or until rice is lightly browned. Add the water, broth, thyme, and pepper. Bring to a boil. Reduce heat; cover and simmer for 35 - 40 minutes or until rice is tender. Fluff with a fork.
Nutrition Facts: 3/4 c. equals 181 calories, 3 g fat, 0 mg cholesterol, 99 mg sodium, 34 g carbohydrates, 2 g fiber, 4 g protein.
Sunday, February 22, 2009
Lasagna
I've never really thought lasagna needed a recipe. After all, it's just layers of meat and cheese and sauce and noodles, right? Well, I found a lasagna recipe makeover in a Taste of Home Healthy Cooking magazine and given my current quest to try eating healthier, I thought it was worth a try. Turns out I loved it and I think it's going to be my new go-to way to make lasagna from now on! I took a picture to post with the recipe, but I am a horrendous photographer of food, so I decided against posting the picture - don't want to scare anyone away!
I ordered a free trial issue of the magazine and I'm trying to make a few of the recipes from it before I decide if I want to continue or cancel the subscription. Here's the recipe - let me know if you try it!
Lasagna Deliziosa
9 uncooked lasagna noodles
1 pkg. (20 oz.) Italian turkey sausage links, casings removed
1/2 lb. lean ground beef
1 large onion, diced
2 garlic cloves, minced
1 can (28 oz.) diced tomatoes, undrained
1 can (12 oz.) tomato paste
1/4 c. water
2 tsp. sugar
1 tsp. dried basil
1/2 tsp. fennel seed (I omitted this)
1/4 tsp. pepper
1 egg, lightly beaten
1 container (15 oz.) reduced-fat ricotta cheese
1 Tbsp. minced fresh parsley (I used dried and just decreased the quantity a little)
1/2 tsp. salt
2 c. shredded part-skim mozzarella cheese
3/4 c. grated Parmesan cheese
1. Cook noodles according to package directions. When done, drain and rinse in cold water. Meanwhile, in a Dutch oven, cook the sausage, beef, onion, and garlic over medium heat until meat is no longer pink. Drain the extra grease.
2. Stir in the tomatoes, tomato paste, water, sugar, basil, fennel, and pepper. Bring to a boil. Reduce heat; cover and simmer for 15 - 20 minutes, stirring occasionally.
3. In a small bowl, combine the egg, ricotta cheese, parsley, and salt. Spread 1 cup meat sauce in a 13 x 9 in. baking dish coated with cooking spray. Top with three noodles, 2 cups meat sauce*, 2/3 c. ricotta cheese mixture, 2/3 c. mozzarella, and 1/4 c. Parmesan. Repeat layers twice.
4. Cover and bake at 375 degrees for 40 minutes. Uncover; bake 10 - 15 minutes longer or until a thermometer reads 160 degrees. Let stand for 10 minutes before cutting.
Nutrition facts**: 1 piece equals 323 calories, 12 g fat, 79 mg cholesterol, 701 mg sodium, 28 g carbohydrates, 4 g fiber, 25 g protein.
*To me, it made a lot more sense to put the ricotta on the noodles first and then add the meat sauce, so that's what I did. It's a heck of a lot easier to spread the ricotta mixture over flat noodles than it is to spread it over saucy meat!
**The magazine didn't say how many pieces they cut the pan into, so I don't know exactly what serving size those nutrition facts are for. I have a sneaking suspicion I cut my pieces a lot bigger than I'm supposed to, but then I guess it's a good thing that I used turkey sausage and lower fat cheeses!
Viva la Verve Challenge #2
This was my card for Viva la Verve Challenge #2. The twist for this sketch was to use no patterned paper on your card. This sketch was definitely a stretch for me from my usual layouts, but the card surprisingly came together fairly quickly.
The main image and the vine stamp I used to create the background are both from PTI's Beyond Basic Borders set and were stamped using PTI's Spring Moss ink on PTI white cardstock. I cut and embossed the Chocolate Chip circle using my nestabilities and created the ovals with my Marvy giga scallop and mega classic oval punches. The strip of kraft cardstock is from PTI, as is the Ripe Avocado ribbon and Ripe Avocado cardstock. The clear gemstones are from the beading section of Joann's, the green buttons have been in my SU stash for ages, and the white buttons are from the new PTI vintage button collection.
Saturday, February 21, 2009
Viva la Verve Challenge #1
This is for the first Viva la Verve challenge over on SCS - if you complete all 4 of the sketch challenges in the Verve Stamps member company forum, you'll be entered to win their entire March release! That's too good to pass up! Each of the sketches come with a twist - the twist for this one is to use embossing of some sort - heat embossing, dry embossing, anything goes!
Today I went to visit my friend Jenn, who was my college roommate for two years, at a hospital in New York City. She woke up a few weeks ago with the left side of her face drooping and she was unable to use her left arm. Unfortunately her symptoms have gotten worse over the past few weeks, and though the lesions the doctors found on her brain suggest multiple sclerosis, the rapid worsening of her symptoms are uncharacteristic of the disease. So for now, the doctors are stumped and she is stuck in the hospital receiving high doses of steroid treatments, unable to even get out of bed on her own because she can't feel her limbs on the left side of her body. So if you think of it, please say a prayer for her that the doctors find an answer and can heal her! The reason I share all this is because I made this card to take with me today. Though I don't always practice what I preach in my own life, I do believe in the power of positive thinking. I hope Jenn can keep her spirits up and hope she will display this card in her room to remind her that she has lots of people praying for her and that she can make it through this horrendous time in her life. Anyway, onto the card details, since that's what you're probably here for anyway!
My take on the twist was to do some dry embossing with my cuttlebug using the swiss dots folder. I embossed the front of the card base as well as the strip of SU Pumpkin Pie cardstock. The ink and blue cardstock are both SU Night of Navy and the patterned paper is from Chatterbox. I think that paper is just gorgeous! The sentiment is stamped onto PTI white cardstock and punched out with my Marvy giga scallop oval punch. I then adhered it to the card with foam dimensionals (which I also used to raise the entire cardstock/patterned paper panel up off the card base) and dotted each of the scallops with opal liquid pearls. The card was finished off with wedding bells dew drops. This card took me over an hour to make (I am VERY slow at coming up with card designs!) but I am really loving how it turned out and Jenn loved it too, which is really all that matters!
I'll be back tomorrow with Challenge #2!
Wednesday, February 18, 2009
Final Card Kits
The first kit today is actually not for a card, it's for a little treat bag! Barb sent us a video tutorial for this little bag and you can view that tutorial here. She also sent us the mini brown lunch bags needed for the project - just cut them down as instructed in the video (I cut mine down to 2.5") and adhere the die cut pieces as the front and back of the bag. I included both front and side shots so you can get a better idea of what the finished project looks like. This was a really quick and easy project (especially since the piece were already die cut for us!) and would be fairly simple to reproduce as favors for wedding or
bridal showers or really any other
occasion where you need cute packaging for a little treat! The paper that Barb included in her kit is so pretty and is flocked for some fun texture. I'd never made a little bag like this before and I really like it!
The next card is made with Tammi's kit. Hers features another Changito stamp - I think these girls were trying to kill me by making me butcher all these monkeys with my poor coloring! I stamped the background of the card with PTI's Polka Dot Basics to mimic the polka dots on the patterned paper by Fancy Pants Designs. I kept this card very simple - just a few layers of paper and then the main image is popped up with dimensionals on a mat punched with my Marvy mega scalloped oval punch.
And finally, we have the card I made with Colleen's kit. This image is from a set by Storage Units, Ink, and More and definitely forced me to stretch my creativity a little, as I don't normally stamp with images like this one. I colored the boy and girl with SU and Copic markers and kept this one pretty simple too, only adding the small flower gemstones in the corner.
Well that's it for the kits! We've got another round of kits coming up, this time with a Spring/Easter theme, and I'm currently debating whether I
should join that one too. So, you just might be seeing another bunch of kit cards in a month or so!
Tuesday, February 17, 2009
Next Group of Kits
The first card today was made with Kim's kit using the Stampavie Roses for You image and Bo Bunny Sweetie Pie Squeeze patterned paper. The image is colored with Stampin Up markers and you can't really see it in the photo, but I then painted the pink roses with opal Shimmerz. The corners of the image panel were punched with a ticket corner punch and embellished with clear gemstones. Black brads were added to the horizontal strip to tie in the black dot centers of the flowers on the patterned paper.
The second card was made with Kris'
kit. The image is from Memory Box and the patterned paper is from the Basic Grey Bittersweet line. The penguin is cut out and popped up with dimensionals on an oval that I punched with one of my Marvy scalloped oval punches and stamped with a border from the PTI Oval Borders & Corners set. The center strip is cut from a panel embossed with a Cuttlebug hearts folder.
The final card is from Rachel's kit. She sent two of the most gorgeous papers - the foiled hearts paper I used for my background and the sparkly paper I have going diagonally across the card. This is not what I planed on doing for this card, but when I was cutting the sparkly paper, the paper slipped and the blade cut it crooked, so I had to improvise with what was left. I used my paper piercing tool to create the dotted lines between the panels of foil paper and finished the card off by popping the heart up with dimensionals. Oh, and it's not easy to see in this picture, but I traced all the swirls in the stamped heart with a clear spica glitter pen.
That's it for today - I'll be back tomorrow with the last three VDay kit cards!
Monday, February 16, 2009
More Card Kits
I've got some more of the Valentine's Day card kits to share today. This first one was made with Cindy's kit. The image is a Changito stamp and the patterned paper is Bo Bunny Sweetie Pie Swoon. Cindy included the white heart embossed with the Swiss Dot cuttlebug folder, so I stamped the base of my card with PTI's Polka Dot Basics to carry the dotted theme through the whole card. The heart is adhered to a little strip of pink twill from Taylored Expressions to create a little corner piece. The vine was traced with a clear spica glitter pen and that's about it!
The second card today was made with Jeannie's kit, which was one of my favorites - no coloring required! I cut out the heart and popped it up over the stamped swirl with a dimenstional. The strip of pink cardstock with the ribbon over it looked weird to me on top of the pink patterned paper, so I sponged the edges with brown ink to give it a little definition. I then ended up sponging the edges of the patterned papers and the entire card with brown ink as well. I tend to go through phases with sponging - I won't do it at all for a long time and then remember how much I like it and go a little crazy! All stamps and paper on this card are from Stampin Up.
The last card today was made with Debbie's kit. The image for that card is not actually a stamp, but a digital download from All That Scraps. It was in making this card that I confirmed I need more Copic markers. The only one I have that's sort of skin toned is one that's called Flesh, so when I bought it I thought it would be perfect, but it's really too orangey for my taste and I especially don't like it with the other colors I used to color the image. But oh well, I had to make do! The hearts on the girl's hat and coat are colored with a glitter pen for some sparkle and everything else that's pink on her is actually flocked with pink flock from Stampendous. So all her trim is nice and fuzzy to touch! The hearts on the patterned paper and the sentiment are both traced with a clear glitter pen. Patterned paper is from American Crafts and the sentiment is A Muse.
That's it for today, be back with more tomorrow!
Sunday, February 15, 2009
Valentine's Day Card Kits
I know, Valentine's Day is over, but I just have not had my stamping mojo with me, so I've only just now finished all the card kits that I was supposed to finish and share last weekend! The LOSTies did another card kit swap where we each had to provide a stamped image, cardstock, and patterned paper, and all of the participants had to put their own twist on a card using those materials.
This first photo is the card I made for my own kit. The image is from Stamping Bella and to be honest, I don't remember what company the patterned paper is from! It's a little tough to see in the picture, but the entire glass is painted with Opal Shimmerz for a nice sparkly shimmer. The heart on the stirrer is also painted and is popped up with a dimensional. Poinsettia dew drops finish off the card.
This next card was made with Suzanne's kit. I am NOT good at coloring animals or people or anything
"real" like that, so these Changito stamps are hard for me. Not much to talk about here, I just stamped a small flower from SU's Simply Said onto the So Saffron cardstock and added the flower gemstones to the corner of the image. Everything else was from the kit.
This third card was made with Laura's kit. I colored in the dots and the outline of the middle heart with a Sakura red glitter gel pen. The scalloped edge of the front is shorter than the back of the card, allowing the patterned paper adhered to the inside of the card to show from the front. That's about it!
I've got 9 more kits to share, but I'm thinking since I've had such a lack of things to share on my blog lately, I'll space those out over the next couple of days. So check back tomorrow for a few more!
Thursday, February 5, 2009
PTI It's in the Bag Challenge
Papertrey Ink is celebrating its 2 year anniversary with 2 whole weeks of give aways and exciting announcements. Today's challenge is to create, alter, or decorate a bag of any kind, so I made this cardstock tote. It is perfect for giving or storing standard A2 size cards and also works great as a gift bag for any number of small gift items. I've made quite a few of these over the years, but this is my first using PTI materials and I love how it turned out!
The base is Aqua Mist cardstock and the patterned paper is from the Polka Dot Parade collection. The ribbon handles are double stitched grosgrain in Ocean Tides. To make the tag, I used a metal edge tag from SU and punched out a piece of polka dot paper of the same color scheme, but in a smaller scale. The flower is one of the bridal flowers from Michael's that I dyed by pressing it into a silver Encore ink pad. A small punched out dot of Ocean Tides cardstock is adhered to the center of the flower, and the tag is attached to the bag using some silver cord.
I debated about stamping the base with Polka Dot Basics using Aqua Mist ink, but didn't know if that would be overkill with the polka dots (if too many polka dots is even possible!). I'm still not sure, but the lack of stamping sure made for a very quick and easy project!
Subscribe to:
Posts (Atom)