
 Just a quick card that I made for my aunt, whose birthday is on Saturday. It's actually a CASE of a card I made over the summer, but pretend you've never seen anything like it before. :-) I'm reinstating the rule that I have to use something new on every card I make (and by new I mean something I've been hoarding for ages and haven't used yet!). I'm hoping this will make me forget that I'm banned from buying new stuff for a while. And really, I do have sooo much stuff, more than I could ever use in a lifetime probably! The new thing used on this card is the ribbon, which I've probably had for close to a year but has seen no love. The bucket is colored with a silver Sakura gel pen and the centers of the flowers are dotted with a clear spica pen. The image is from Memory Box, the polka dots are from PTI's Polka Dot Basics, and sentiment is from PTI's Birthday Basics. Colors are PTI's Berry Sorbet and SU's Certainly Celery. Hardware is from SU.
Tuesday, November 25, 2008
Happy Birthday Aunt Jane!
Just a quick card that I made for my aunt, whose birthday is on Saturday. It's actually a CASE of a card I made over the summer, but pretend you've never seen anything like it before. :-) I'm reinstating the rule that I have to use something new on every card I make (and by new I mean something I've been hoarding for ages and haven't used yet!). I'm hoping this will make me forget that I'm banned from buying new stuff for a while. And really, I do have sooo much stuff, more than I could ever use in a lifetime probably! The new thing used on this card is the ribbon, which I've probably had for close to a year but has seen no love. The bucket is colored with a silver Sakura gel pen and the centers of the flowers are dotted with a clear spica pen. The image is from Memory Box, the polka dots are from PTI's Polka Dot Basics, and sentiment is from PTI's Birthday Basics. Colors are PTI's Berry Sorbet and SU's Certainly Celery. Hardware is from SU.
Monday, November 24, 2008
LOSTie Christmas/Winter Kits
Over the last month, some of the LOSTies participated in a card kit swap - the theme was Christmas/winter and each participant had to send each of the other girls some stamped images as well as cardstock or patterned paper. Everyone then had to take those materials, add some of their own embellishments, and create their own card. It's really cool to see how many different takes there are using the same materials. I chose not to participate because with moving and all, I had to pack up my stamp supplies and didn't have time to put a kit together. I also wasn't sure when my stamping stuff would be unpacked and if I'd ever have a chance to put the kits together. But, those girls are too sweet for words and each made up an extra kit for me to play with when I got settled! Thank you!!!
And here they are:

This was Amanda's kit. I'd been wanting to try an acetate card for a long time and had just never gotten around to it, so this was a welcome challenge! I wish I had stamped something on the acetate to make it stand out more, but I guess I didn't realize that we could add stamps to the card beyond the stamped images we received in the kit and maybe a sentiment if needed. Again, I was taking this much too literally! The patterned paper is adhered on the inside and the image is on the outside so that the adhesive I used on the pieces was completely hidden. I did the same thing on the back panel - one piece adhered on the inside of the card and one on the outside.

This one was from Barb - more acetate! She had the globe from Lizzie Anne Designs' Build a Bauble set stamped on acetate, so I used it with the base piece to create a snowglobe of sorts. Only there's no snow, just merry Christmas wishes in a lot of languages! The three circles in the bottom corner were punched out of a scrap of the patterned paper I had left with a 1/4 in. punch. Other than that, I just added some SU grosgrain ribbon.

This kit was from Cindy. I decided to make it into a tent topper card using my Marvy oval punches. I used SU's word window punch on the red strip to allow the sentiment to show through. Added some stardust stickles to the snow and snowflakes on the Elzybell image and that's it!

Next up is Colleen's kit. This is the first card I've ever made with a MFT image because usually I'm adverse to headless people, but this stamp I like! I just used a bit of a random layout so as not to hide the cuttlebugged patterns on the white and aqua papers. I added a clear gemstone to the center of the snowflake embellishment and lots of stardust stickles to the snowy ground!
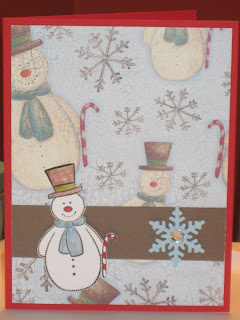
This kit is from Debbie. I love this paper and the cute snowman image and I just didn't do them justice. I couldn't figure out how to put this card together using all the components Debbie included (there was another piece of patterned paper and cardstock too), and I'm regretting my choice of red for a card base, but I didn't figure out until I'd adhered it all that brown really would have been better. But by that point the paper would have ripped if I'd tried to unstick it. The snowman is cut out and popped up with dimensionals and the snowflake is popped up as well and then embellished with a large clear gemstone.

This card kit was from Edie and I think it was my favorite because there was no coloring involved! You may have noticed that I very rarely post cards that involve coloring and if they do, it's just little detail work here and there. So a lot of the kit images were a real challenge for me. I am not good at watercoloring and do not have Copics, so it's really a struggle to get my stuff to look good. So, Edie's card was a welcome break! Plus, the ink is a gorgeous metallic and the light and dark teal cardstocks are shimmery! So pretty in real life! I kept this one pretty simple, just added A LOT of gemstones for even more sparkly bling!

This was from Jeannie's card kit. She included three different pieces of patterned paper and, again, thinking I needed to use them all, the only thing I could come up with was punching out a circle of each one and popping them up with dimensionals. My mojo was not with me for many of these cards, as you can tell! The pink background was stamped with Papertrey's Polka Dot Basics and I added SU grosgrain. That's it!

I cheated just a little bit with Justine's kit. She included a piece of Baja Breeze cardstock embossed with the cuttlebug snowflake folder and it was so pretty, but the paper is also very pretty (and glittered in real life) and I didn't want to cover it. So, I cut out two of the embossed snowflakes (NOT something I would ever do for mass producing) and put a dimensional between the two of them, added a gemstone on top, and created my own embellishment out of it. The moose is stamped on shimmery cardstock and I added some stardust stickles to the snow for extra sparkle.

This kit is from Kim. I LOVE this Wassail paper from Basic Grey but I am really trying to avoid buying it since I'm on a stamping spending ban for a while. So I'm glad I got to play with one piece of it at least! The owl is punched out with the mega Marvy circle punch and then the giga scallop circle is matted behind it. That whole thing is popped up with dimensionals. I dotted the scallops of the circle and on the scallop border with a white gel pen (the BEST white gel pen I've ever used btw - made by Inkssentials. I've tried so many different ones and this is only one that always works for me!) and added SU grosgrain ribbon across the kraft piece. I wish I'd cut that whole strip across the bottom a little more narrow, but again, didn't figure that out until it was already adhered.
 Next up is the kit from Kris. The piece of vellum cuttlebugged with the snowflake embossing folder was included in the kit and I just put a white strip of cardstock behind it to make it pop more. Kris also included another strip of paper from the Basic Grey Figgy Pudding collection that I really wanted to use because it had presents on it and that goes perfectly with elves, but I just couldn't make it all work. This was one of the last kits I pulled out of the envelope, so by this point I was breaking rules and not using all the pieces. ;-) Overall, pretty straightforward, I just added some wedding bells dewdrops to the left corner.

This weekend I got a lot of playing time in and tonight was able to finish putting together all the kits. Let me tell you, it was not easy. This was the first swap of this kind that I'd done before and I think I took things too literally. I felt like I had to include every component included in the kit, so if there were 3 different designs of patterned paper, I thought I had to use them all. Well, until the last few kits when my creativity was too stretched and I just gave up! I also didn't realize we could add other things of our own, like additional cardstock, besides embellishments. So I'm really not happy with about half of the cards I made. I avoided looking at any of the cards the other girls had posted until I was done because I didn't want to be swayed by their ideas, but looking at them now, I realize they all did a much better job because they weren't bound by the rules and in a lot of cases, only used bits and pieces of the supplied papers or added some extras of their own. Regardless, I had fun with them and was definitely forced to stretch myself into using styles that I'm not used to!
And here they are:


This one was from Barb - more acetate! She had the globe from Lizzie Anne Designs' Build a Bauble set stamped on acetate, so I used it with the base piece to create a snowglobe of sorts. Only there's no snow, just merry Christmas wishes in a lot of languages! The three circles in the bottom corner were punched out of a scrap of the patterned paper I had left with a 1/4 in. punch. Other than that, I just added some SU grosgrain ribbon.

This kit was from Cindy. I decided to make it into a tent topper card using my Marvy oval punches. I used SU's word window punch on the red strip to allow the sentiment to show through. Added some stardust stickles to the snow and snowflakes on the Elzybell image and that's it!


This kit is from Debbie. I love this paper and the cute snowman image and I just didn't do them justice. I couldn't figure out how to put this card together using all the components Debbie included (there was another piece of patterned paper and cardstock too), and I'm regretting my choice of red for a card base, but I didn't figure out until I'd adhered it all that brown really would have been better. But by that point the paper would have ripped if I'd tried to unstick it. The snowman is cut out and popped up with dimensionals and the snowflake is popped up as well and then embellished with a large clear gemstone.

This card kit was from Edie and I think it was my favorite because there was no coloring involved! You may have noticed that I very rarely post cards that involve coloring and if they do, it's just little detail work here and there. So a lot of the kit images were a real challenge for me. I am not good at watercoloring and do not have Copics, so it's really a struggle to get my stuff to look good. So, Edie's card was a welcome break! Plus, the ink is a gorgeous metallic and the light and dark teal cardstocks are shimmery! So pretty in real life! I kept this one pretty simple, just added A LOT of gemstones for even more sparkly bling!

This was from Jeannie's card kit. She included three different pieces of patterned paper and, again, thinking I needed to use them all, the only thing I could come up with was punching out a circle of each one and popping them up with dimensionals. My mojo was not with me for many of these cards, as you can tell! The pink background was stamped with Papertrey's Polka Dot Basics and I added SU grosgrain. That's it!

I cheated just a little bit with Justine's kit. She included a piece of Baja Breeze cardstock embossed with the cuttlebug snowflake folder and it was so pretty, but the paper is also very pretty (and glittered in real life) and I didn't want to cover it. So, I cut out two of the embossed snowflakes (NOT something I would ever do for mass producing) and put a dimensional between the two of them, added a gemstone on top, and created my own embellishment out of it. The moose is stamped on shimmery cardstock and I added some stardust stickles to the snow for extra sparkle.

This kit is from Kim. I LOVE this Wassail paper from Basic Grey but I am really trying to avoid buying it since I'm on a stamping spending ban for a while. So I'm glad I got to play with one piece of it at least! The owl is punched out with the mega Marvy circle punch and then the giga scallop circle is matted behind it. That whole thing is popped up with dimensionals. I dotted the scallops of the circle and on the scallop border with a white gel pen (the BEST white gel pen I've ever used btw - made by Inkssentials. I've tried so many different ones and this is only one that always works for me!) and added SU grosgrain ribbon across the kraft piece. I wish I'd cut that whole strip across the bottom a little more narrow, but again, didn't figure that out until it was already adhered.
 Next up is the kit from Kris. The piece of vellum cuttlebugged with the snowflake embossing folder was included in the kit and I just put a white strip of cardstock behind it to make it pop more. Kris also included another strip of paper from the Basic Grey Figgy Pudding collection that I really wanted to use because it had presents on it and that goes perfectly with elves, but I just couldn't make it all work. This was one of the last kits I pulled out of the envelope, so by this point I was breaking rules and not using all the pieces. ;-) Overall, pretty straightforward, I just added some wedding bells dewdrops to the left corner.
This was Rachel's kit. I struggled with this one, wanting to showcase both the pretty paper and the cuttlebugged cardstock, so I ended up going with a very basic layout. I added stardust stickles to the snow and still thought the card looked too plain, so I added a clear gemstone to the center of each of the embossed snowflakes. Not sure if I like that look or not, but those babies are stuck on there!

This one was from Stacy. The trees are stamped on a really pretty shimmery vanilla paper and the paper is pre-glittered for extra sparkle. I just supplemented what Stacy provided with a few extra layers of cardstock and some SU grosgrain.


Whew, that was long! Thanks for sticking with me, if you did! And thanks Tammi for hosting this fun swap and for including me in it even though I didn't send any kits to you! And now, since this post took me over an hour to put together, it's time to find some dinner!
P.S. Please ignore the somewhat uneven layout of this post! It is not cooperating with me and I am too hungry to have the patience to try fixing it right now!

This one was from Stacy. The trees are stamped on a really pretty shimmery vanilla paper and the paper is pre-glittered for extra sparkle. I just supplemented what Stacy provided with a few extra layers of cardstock and some SU grosgrain.

This kit was from Suzanne and I think this came together for me the fastest out of all of them. Well, except for the fact that my big dumb hands smeared red ink all over the first image I colored, so I had to color another one - thank goodness for extra images! This is a really simple card, I just sponged the edges of some of the layers with Old Olive ink, added stardust stickles to the snow, and added a sentiment from Lizzie Anne Designs that I think goes perfectly with that happy Santa!

And finally, this kit was from Tammi, the swap hostess. Tammi is one of the best colorers on the planet, so I knew right off the bat I could never do this image justice. But, I did my best! The background is three different pieces of patterned paper that I pieced together and I added two strips of SU stitched ribbon behind the image. To finish it off, I punched out two holly leaves with my Martha Stewart holly punch and used a glittered brad from Imaginesce as the "berry". This was stuck on the corner with a glue dot.
Whew, that was long! Thanks for sticking with me, if you did! And thanks Tammi for hosting this fun swap and for including me in it even though I didn't send any kits to you! And now, since this post took me over an hour to put together, it's time to find some dinner!
P.S. Please ignore the somewhat uneven layout of this post! It is not cooperating with me and I am too hungry to have the patience to try fixing it right now!
Sunday, November 23, 2008
Blog Candy and a Card
Want to win some awesome blog candy?? Visit Passion for Crafts for a great sampler of Copics and some other fabulous goodies being given away! And while you're there, check out Debbie's talent - seriously cool stuff!
 And while I'm here, I thought I'd share a card that I found on my camera today and haven't blogged about yet. It's already out of season, so I don't want to wait any longer to post it! I made this for my friend Cindy, a fellow candy corn lover, for her birthday, which was right before Halloween. I love how it turned out!
The image is from Impression Obsession's clear candy corn set and the sentiment is from Papertrey's Birthday Basics. The sentiment and the moon were both covered over with a glitter pen for some fun sparkle. All inks, cardstock, and ribbon are from Stampin' Up except the white, which is from Papertrey.
Pumpkin Pumpkin Everywhere!
I'm finally just about settled in to my new condo! I still have some things to buy and some decorating to do, but for the most part, everything is in its place! I even started doing some stamping this weekend - I missed it! I'll share some of those cards later tonight or tomorrow, but for now I thought I'd blog about food!
I love this time of year and all the food that's associated with it. I especially love anything pumpkin so when I saw recipes for pumpkin chili and pumpkin cornbread on the Recipe Girl website, I knew I needed to make them. I'll post the recipes with some comments on changes I made, but check out Recipe Girl for literally thousands of recipes that all look so so good!
Pumpkin Chili
1 lb ground beef
1 cup chopped onions
1 cup chopped green bell peppers
1 clove garlic, minced
Two 14½oz. cans diced tomatoes
1 cup pure pumpkin pureé
1 Tbs ground chili powder
1 tsp ground cumin seed
½ tsp ground black pepper
dash of salt
½ cup grated cheddar cheese
½ cup sour cream
1. Brown ground beef in large sauté pan with onion, green pepper and garlic. Spoon off grease.
2. Return to heat and add tomatoes, pumpkin, chili powder, cumin, pepper and salt. Mix well. Cover and simmer for 20-30 minutes.
3. Serve topped with cheese and sour cream.
My notes:
- I used ground chicken instead of beef because it was cheaper, but it's also a slightly healthier alternative.
- I put at least 3 Tbsp of chili powder in my regular chili recipe, so the 1 Tbsp called for here seemed like not enough to me. I added a little bit extra - not too much because I was hoping to have the pumpkin flavor shine through, so I probably put in about 1.5 Tbsp
- I cooked this in my crockpot, so I did not cook the onions, garlic, and peppers with the meat. I browned the chicken and drained off the grease, and just threw the vegetables right into the crockpot after chopping them. I let it cook on low for about 5 hours.
The verdict: This was very good as far as flavor goes, but I did not detect any trace of pumpkin at all, either in taste or smell. It tasted pretty much like another other chili I've made, just less spicy. I don't know if the 1/2 Tbsp extra chili powder I put in was too overpowering, but I kinda doubt it. I also expected the pumpkin to make the chili a little thicker, but I actually found it a little more watery than my regular chili. It wasn't bad, just not what I was expecting. So all in all, this was a good recipe, but if anything, next time I'd probably just make my usual chili and add some pumpkin to that if I wanted some extra vitamins!
Pumpkin Cornbread
½ cup all-purpose flour
½ cup whole wheat flour
1 Tbs baking powder
1 tsp salt
½ tsp ground cinnamon
¼ tsp ground nutmeg
1 cup cornmeal
2 large eggs
1 cup pumpkin puree (canned or freshly cooked and processed)
2/3 cup brown sugar
¼ cup canola oil
1 Tbs molasses
1. Preheat oven to 400°F. Grease 10-inch glass pie pan or 9-inch square baking pan.
2. Sift flours, baking powder, salt and spices in a large mixing bowl. Whisk in cornmeal.
3. In separate bowl, beat eggs lightly. Whisk in pumpkin, brown sugar, oil and molasses.
4. Make a well in the dry mixture. Add pumpkin mixture and blend batter with a few quick strokes (just until blended- don't overmix).
5. Pour batter into prepared pan. Bake for 30 minutes, or until cornbread is browned and the surface has a slightly springy feel.
My notes: Though the recipe called for half all-purpose and half whole wheat flour, I used only all-purpose. I've never used whole wheat flour in my life and couldn't justify spending $4 on a bag of flour for a recipe that calls for 1/2 cup of it. I don't know if the wheat flour is supposed to serve any purpose other than being healthier, but I didn't notice that using a full cup of all-purpose made anything go horribly wrong!
The verdict: Very good! The pumpkin taste and smell was subtle, but it was definitely there. It was a little dense, and maybe that's because of the flour, but then I don't usually think of cornbread as being completely light and airy anyway. There are a good number of ingredients, but it was easy enough to make and a nice change from your normal cornbread.
Wednesday, November 5, 2008
Change We Need
I have no cards to share today, so this is going to be a strictly word-filled post. Sorry, feel free to skip it! A lot has happened in the few weeks since I last posted, and I finally got internet installed at home tonight, so I feel the need to take advantage and write a little "journal entry" for myself.
1. I am a homeowner! I first found this condo back in May and immediately fell in love. After looking at a number of places, I knew this was the one for me. So in June I made an offer on the place and was rejected. Not even so much as a counter offer, I was just flat out rejected. So naturally I was highly upset and more or less suspended my search for the summer while I just enjoyed the beach and a few fun trips. In September I noticed the condo was listed at a lower price, so I figured it was worth making another offer and this time they countered! After a little negotiating we ended up agreeing on a price just $4,000 more than my offer. YAY!
Then came a whirlwind few weeks full of stress. Things seemed to move so quickly at first and then slowed to a snail's pace as mortgage logistics, contracts, etc. all got worked out. I had to give notice at my apartment for October 31, so whether I was able to close on the new place by then or not, I was moving out! Everything did finally come together, though I didn't actually have a confirmed closing date and time until 2 days before the end of the month. Talk about stress!! Moving out was hellish, but the closing and moving in went smoothly thanks to my wonderful parents.
So now here I sit, my 6th night in my new home, and I'm so happy. My apartment was just a miserable place that I took no pride in and did not enjoy going home to. It is such a pleasure to live somewhere pretty, where everything works as it should and the neighbors are not just considerate, but friendly! I have much unpacking left to do, and a lot of furniture and things to purchase, but all in good time. As the cable guy just told me as I was lamenting all the things I need to do and buy, "Rome wasn't built in a day". He was very wise. :-)
2. If you've made it this far, I do have a snippet of stamping news - remember that Papertrey nugget box with the snowmen that I posted a few weeks ago? Well it won Honorable Mention in the Best Winter Project category of Papertrey's Guest Star Stamper contest!!! Usually those resulted are posted immediately after each month's release, but this month Nichole was delayed due to the Papertrey/Gina K/Stamping Bella cruise. She made the announcement last week when she got back, but due to my lack of internet for a few days, my Google Reader subscriptions were neglected and I almost didn't see the news! I was so excited to see it and so honored. It's no secret to many that know me that Nichole Heady is my stamping idol and it was such a thrill to have her select my project as one of her favorites!
And now the most important news of all (yes, perhaps even more so than my lovely condo!).....
3. Barack Obama has been elected the 44th President of the United States of America!!!! I have never been one for politics. Sure, I have voted in every election I've been able, but aside from doing a little research on the candidates and their stances, I've ignored it all. I've never watched debates, I've never stalked electoral map projections, and I've never been glued to the returns on election night. But this year was different. This year, more than ever, our country needed a change. We are in the midst of probably the most turbulent years in my lifetime, given the two wars we are waging overseas, the climate issues we are facing, and certainly not least, the economy. This year it was as if I was possessed the way I devoured everything I could read, watched everything I could watch, and debated everything I could debate. For me, the choice was clear. We needed Barack Obama. His intelligence, his calm demeanor, and his ability to understand the issues facing all Americans today were unmatched.
As I waited in line at my polling location for just over an hour yesterday morning before work, my heart was singing. The long line that awaited me when I arrived just before 6:30am didn't frustrate me. It warmed my heart. I was so proud of Americans, proud to see so many people taking an active interest, perhaps for the first time in their lives. I was positively distracted all day long, just waiting for the evening to come and the polls to close. As precincts across the country began reporting in, that distraction became an all out explosion of nerves and anticipation and hope. Given that I had no cable here, I went over to a friend's house to watch the coverage. I was so happy to be there with her on what was likely the most historic night of my life to date. As Pennsylvania was called, and then Ohio, we looked at each other in joyful disbelief. In spite of the favorable projections for Obama prior to election day, I tried not to get ahead of myself and presume that enough Americans could band together to make change happen. But as Obama's electoral votes climbed, I realized he had been right all along. Yes we can.
I cried when ABC's Charlie Gibson announced Obama's victory. I cried again during his inspirational and eloquent address. There is a long road ahead, and Obama knows it - there was an air of solemnity about him in spite of his incredible achievement. Things will not be fixed overnight, and likely won't be fixed in the next four years. But we have a start. Americans spoke up en masse yesterday and called for change. Despite its hardships, I feel blessed to be a part of this era in history and have nothing but hope for the future of America.
Subscribe to:
Posts (Atom)


